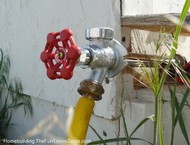
 A sillcock, otherwise known as an outdoor faucet or bibcock, can be invaluable if you’re interested in gardening, watering your lawn, or even washing a car.
If your house doesn’t have one or you could use a sillcock in a more convenient location, consider installing one yourself.
Installing a sillcock requires that you have access to the pipes that run underneath your home via a crawlspace or basement.
Get underneath your house and check and make sure that you have a cold water pipe you can tap into in the general direction that you wish to install your outdoor faucet. Mark where you plan on attaching to the pipe as well as the path the plumbing will take to the outside of your home.
Step-By-Step Instructions for Installing a Sillcock (Hose Bib)
Before continuing with this project, be sure you have turned off the water to the area of the house you will be working on and drained the pipe by turning on the water of nearby faucets until the water stops flowing. Then go to the exterior of your home and mark where you intend to place the hose bib.
Drill a hole for the sillcock using a 1″ spade bit. Place a bead of silicone caulk around the hole you have created and then press the hose bib into place. Then turn the faucet to the on position.
Go to the place where you intend to tap into the cold water pipe and install a T fitting. A T fitting, which is shaped like the letter ‘T’ comes in a variety of different materials to match the type of plumbing you have in your home. If you have PVC pipes, you can cut the plumbing with a hacksaw and install the T fitting using a PVC plumbing compound. Other types of plumbing are more difficult to work with and may require a plumber to install the T fitting.
Don’t Forget the Shut Off Valve
Plan on installing a shut off valve in between the sillcock and the T fitting and using two lengths of pipe to connect the pieces together. Most sillcocks have a threaded end that simply requires plumbing tape to be wrapped around the end before it is screwed into place.
With all of the pipes fitted together, turn on the water main and allow it to fill the pipes. When water starts to come out of the sillcock, let it flow for a few minutes and then shut it off. Next get under the house once more and carefully check for leaks and make any needed adjustments.
Is This Project Within My Skill Level?
The difficulty of this project will depend on the type of plumbing you have and your experience in working with it. If you are uncomfortable working with plumbing, or don’t have tools necessary to complete the job, consider installing the hose bib on the exterior of your house and calling a plumber to connect it to your plumbing system.
I have a lot of hands-on experience in the home construction industry, with a good deal of experience in sustainable building. I’m mostly interested in home restoration and home renovations.

