
It’s so hard to focus on DIY projects this time of year. There are baseball series going on, hockey is underway, football is in full swing, golf is still going strong, and basketball season just started too. Not to mention the weather is fantastic!
But… a weekend warrior must soldier on to keep on top of home projects.
My DIY project this past weekend was cutting and installing wainscoting — in the style of picture frame moulding — in our dining room. (Yes… I snuck in a little game time, too!)
Wainscoting: Chances are, you’ve heard the term before, you just don’t necessarily know what it means. Traditionally, wainscoting referred to an element of home design in which solid wooden panels were installed across the lower half of a room’s walls to help keep the room warmer (we’re talking pre-insulation days), but over the years the term has grown to include multiple forms of decorative wall paneling.
– Source
Reasons To Install Picture Frame Moulding DIY
Installing picture frame molding (or shadow box wainscoting) in the dining room has been a rewarding project because:
a) It adds a touch of class for cheap.
b) It adds a great final touch to the room.
c) It’s not a difficult DIY project (unlike the crown molding I put up a few weeks ago).
What follows are the steps I went through to get the dining room picture frame moulding project underway and to bring it to completion.
How To Determine How Much Picture Frame Molding To Buy
The first thing I did was to take measurements of each wall below the chair rail.
I also drew a detailed diagram with all of the measurements:
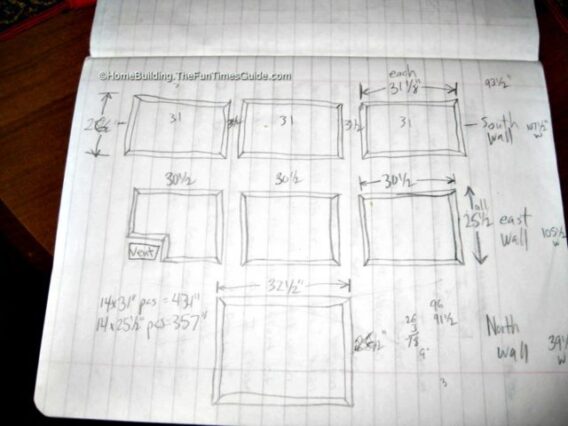
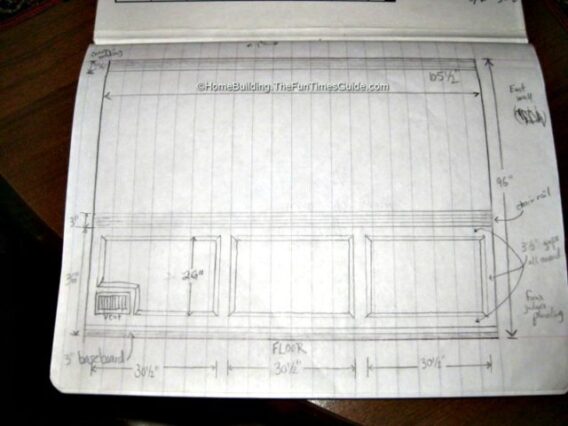
That might be a little much for some of you who would rather just write some measurements on a sheet of paper, but it helps me keep on track and speeds the process for me.
Then, I did a little math and figured out how much picture frame moulding I would need.
Here’s a wainscoting layout calculator you can use.

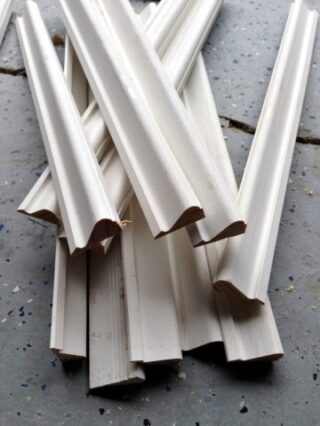
The picture frame moulding I chose came in 8-foot sections — so I had to combine different lengths that would be needed to make the most use of each piece of trim molding. (I also added about 15-20% for waste and mistakes.)
We actually got the wainscoting at the same time we bought the rest of the molding for the dining room. We went to the local home improvement center and picked out a wainscoting molding style that would complement the existing chair rail and crown molding that I had installed previously in the same room.
- See an example of raised wainscoting.
- See an example of recessed wainscoting.
How To Determine Spacing Between The Picture Frame Boxes
When I measured the walls, I figured out how many inches would look good as a spacer between the edge of the wall and where the first piece of molding would be installed.
The spacing between wall frames should be from 2¾ to 3½ inches — but the space above and below can be as much as 4 inches. Whatever spacing you choose, stick to it all around the room. The frames can change size, but the measurement above, below, and between them must remain consistent.
– Source
In my case, I used 3½ inches for the spacer.
I used the same 3½ inch distance on top, bottom, and in between each picture frame box.
I had also looked at how far the gap was on new houses I had been looking at, in order to get a good idea of industry standard.
NOTE: I did make an exception on the wall of the dining room where the full-length bay window is located. Since the gaps between the walls and window casings are narrow, I squeezed it in by 1 inch. I wanted all of the walls to look symmetrical, but it just didn’t look right to me because the picture frame boxes would have been too narrow.
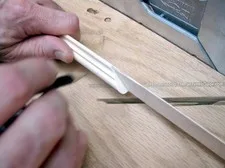
How To Cut Picture Frame Moulding
These are the materials you will need:
- Measuring tape
- Pencil
- Level
- Carpenter’s wood glue
- Nails (#18 x ¾-inch zinc-plated wire brads)
- Hammer
- Compound miter saw
- Nailset
- Wood filler
- Sandpaper
- Paint and primer


You will need to cut 45° angles with the thinnest (and fanciest) part of the trim on the inside of the box.
See step-by-step how to cut 45° angles using a miter saw.
All of your vertical pieces should be the exact same length — with the exception of any walls where you have an electrical outlet, window, or HVAC return/vent to cut around.
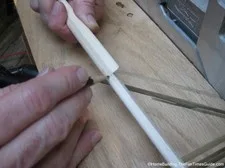
After I cut my first vertical piece, I used it as a template for the remainder of the vertical pieces. I simply put the flat edges back-to-back and drew my lines on the face of the trim — so I knew where to cut. This will give you a consistent length throughout.
WARNING: Be careful! Keep your fingers out of harm’s way when using the compound miter saw. And always wear safety glasses.

I did the same for the horizontal pieces — except when it came to making cuts to trim out around the HVAC return.
Other notable exceptions were all of the special 22½° cuts that were required for the bay window angles. They all had to be cut as individual units — because the lengths were not consistent between the gaps. So I placed the top piece up against the piece to be cut, drew my line, and then made my cuts in the opposite direction for the bottom. That way, I knew it would square up.

This video has some good tips on how to cut molding:
How To Install Picture Frame Moulding On Walls

This next part was a little tricky…
I made a measurement on the wall 3½ inches away from the side and top — and made a small mark on the wall. This was the starting point to place my first horizontal piece.
Then, I got my level and placed it on top of the molding. Once it was perfectly level, I drew a faint line across the top (or bottom, your choice) of the molding. Don’t worry about the line — because you will paint the molding and the wall when you’re done.
See how to balance wall and wainscot paint colors.
Before you start hammering nails into the picture frame molding, here’s a tip…

If you do not have a nail gun (or brad nailer), then you will need to pre-drill the nail holes in order to prevent the wood from splitting. This will also free up a hand to hold the hammer while you hold the molding level.
I placed the molding on top of my aluminum level and lightly hammered the nails in until they tapped the level. This kept the wire brads from protruding through the backside of the molding and freed up a hand to hold the trim while I hammered it in.

I used 3 nails per piece of molding — one in the center and one on each end. Don’t nail it any closer than about 1½ inches from the end of the molding, or the wood may split on you!
Next, I spread a thin layer of carpenter’s wood glue along the backside and on the ends of the molding.

Finally, it was time to start nailing the picture frame moulding to the wall…
I suggest nailing the top piece first, then both sides.
Do not nail in the bottom nail of the vertical molding until you’re ready to place the bottom horizontal piece. This allows you to make slight adjustments — left or right — in order to square it up for tight joints. Hammer in the remaining nails once you’re satisfied with how the angles meet.
GLUE TIP: Good contact is essential, in order to keep the molding flush to the wall — so be sure to press along the entire length of the molding after you’ve nailed it to the wall to ensure that the glue attaches to the wall nicely. Then, run your finger along the edges and where the 45° angles meet — to remove any glue that may have squeezed out.
Next, grab your nailset and tap in the nail heads — just below the surface of the wood. Take it easy… or you may pound the nail all the way through the molding!

NAILSET TIP: Nailsets have different tip diameters for different nail head sizes. I have a couple of them, but I used the thinnest one for this project for obvious reasons.
Once you’ve completed all of your picture frame moulding boxes, it’s time to fill the nail holes with wood filler. There are different types of wood filler, so make sure you choose the right one. Once it’s dry, you have to go back over the wood filler with sandpaper in order to smooth it out prior to painting.
WOOD FILLER TIP: A friend of mine told me about a carpenter’s trick that he learned from a contractor who did some work in his home. He said to use window glazing to fill nail holes instead of using wood filler. When you use window glazing, you save a step — because there’s no sanding necessary. Just wipe it flush when you apply it!
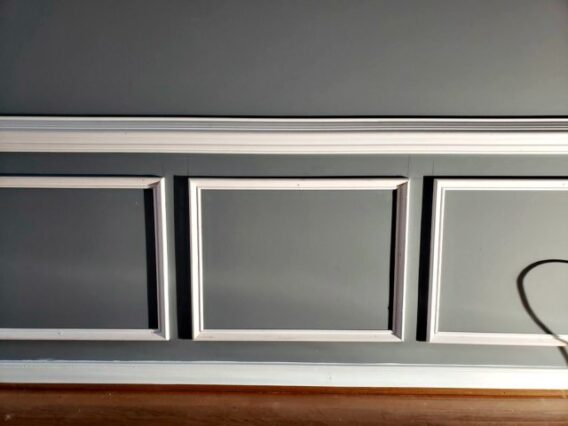
Now, the only thing left to do is prime and paint your wainscoting. This photo shows the wainscoting before I painted it:

PAINT TIP: Some people like to paint the inside of the picture frame box a darker shade than the remainder of the wall surrounding it — to make it stand out.
And that’s all there is to it!
(Keep in mind… this DIY project will go faster if you turn the game off.)
More Shadow Box Molding & Wainscoting Tips
In addition to the links I’ve included above, here are some other resources to help you complete your picture frame moulding DIY project:
- 10 Styles Of Wainscoting
- Another Picture Frame Moulding DIY Project
- How To Use Picture Frames To Produce A Wainscoting Effect


