I marked off another (long overdue) item from my honey-do list recently.

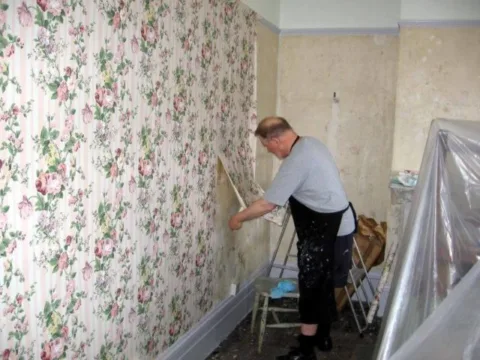
We removed the original wallpaper in the master bathroom, repaired the drywall, primed and painted it, and replaced all of the fixtures with new ones (with the exception of plumbing fixtures). It looks 1,000% better than it did before.
If you are thinking about taking on some or all of the tasks I’ve just completed, I’ve got some great tips to help you.
Thank goodness my wife worked with me on this DIY project. Otherwise, it would have taken much longer to complete.
Amazingly enough, a divorce is not in the works because when a painting project comes along, (historically) my family literally leaves the house. I’m fairly unbearable to deal with when I’m in paint mode.
I am very detail-oriented and it isn’t always such a great idea to have a partner on such tedious projects as painting and wallpapering. I’m just better off left on my own but it worked out this time and it’s all good.
I must be mellowing with age like fine wine.
Tools Needed To Remove Wallpaper
A few items are all you need to successfully strip wallpaper (and I’ve tried many). Here is what works best for me:
#1 – Paper Tiger
Found in practically any home improvement/paint store, the Zinsser Paper Tiger will allow the enzyme in the wallpaper remover to permeate the wallpaper and do its magic.
Here’s how to use the Paper Tiger:
- Put the Paper Tiger in the palm of your hand and — using just enough pressure to produce wallpaper “chads” while leaving the drywall unscathed (score it).
- Make circles on the wall moving slightly forward after each rotation. DO NOT USE EXCESSIVE PRESSURE! You’ll regret it later.
- Then proceed to move up, down, and all around until the wall has thousands of little holes.
The more holes there are, the better the remover will work — making removal of the wallpaper even easier. Trust me!
#2 – Liquid Spray Wallpaper Remover
There are many brands, but I’ve found my best success with M-1 wallpaper remover made by the Jomaps Company. Zinsser DIF also works very well.
Here’s how to use a spray wallpaper remover:
- After you’ve scored the wallpaper, begin spraying a single section of wallpaper from top to bottom.
- Wait a few minutes and grab a corner towards the top.
- Slowly begin to pull down and towards you at the same time using the putty knife in areas that are stuck a little better than others.
- The paper will tear on you. If you get one gigantic piece, pat yourself on the back! You’ve got the hang of it.
With any luck, the person that applied the wallpaper primed the wall before putting the paper up. It makes for a much easier job of removal if/when the time comes.
#3 – Small, Medium, & Large Putty Knives
Using putty knives is one of the easiest ways to remove wallpaper glue.
Here’s how to use them:
- While the glue from the wallpaper is still moist, scrape the wall gently with a putty knife at a 15-20 degree angle — so you don’t tear the paper layer on the wallboard. It is damp also and could cause a problem if you’re not careful.
- As you scrape the old glue off the wall, be sure to wipe the putty knife edge with a damp cloth or sponge for a clean edge. A clean edge means less chance of gouging your wall.
- Dip the cloth or sponge in a warm bucket of water every now and then to rinse it out.
#4 – Large Sponge Or Cloth
Removes the old glue while it is still wet from the wallpaper remover spray — for a nice, clean wall.
Be sure to wipe the wall down with the warm, wet sponge or cloth (after scraping a small section) — to wipe off the residual glue from the wallboard.
#5 – Bucket Of Clean Warm Water
Use it to keep your tools clean. Change out your water often for best results.
What If The Old Glue Is Left On The Wall?
A good question, and one that I had to answer while removing the wallpaper from our bedroom walls!
We were tired and short on time when we were removing the wallpaper, so the old glue dried on the walls and was very rough to the touch.
I considered spraying it all down again and scraping/wiping it all clean, but that would have taken a considerable amount of time.
Instead, I bought a couple of the dual-sided sanding sponges that have 2 different grits on opposite sides — one side with a medium grit for quick removal, and the other side with a fine grit for finishing.
It worked much better than I thought it would, and (with the right touch and pressure) the wall turned out remarkably well. In fact, it is the smoothest wall in the house and left behind no clues that we had lots and lots of (repaired) nail holes and drywall anchor holes.
The Bottom Line On The Easiest Way To Remove Wallpaper
We removed the old wallpaper from another room (dining room) in our house since I posted this article, and I have a couple more suggestions that you can use:
- Wallpaper is generally made up of 2-3 layers of material: the decorative outer layer that you see and 2 thinner layers on the backing — at least the brands we removed did.
- We removed the wallpaper in the dining room just by lifting an edge and pulling — dry and without using the scoring tool.
- Sometimes it came off completely and sometimes only the decorative top layer came off. And still, other times nothing was budging. That’s when I decide to get out the Zinsser DIF wallpaper remover
solution. The directions instruct you to dilute the solution with warm water (it works with cold water, too, I found out) and pour some in a paint tray.
- Next, I got my roller out, and put the thinnest nap roller I could find on the roller.
- Then, I just pretended that I was painting by rolling over the area of wallpaper I wanted to remove.
- I would suggest that you begin rolling upward — because, initially, there will be some excess liquid dripping out of the roller. Rolling upward catches the excess and it automatically gets applied to the wall.
- Only ‘paint’ as much as you can completely remove with the putty knife before it dries. Otherwise, you’ll find yourself re-rolling walls. No biggie, but it will save some time and materials.
MUST READ: Part 2 for the best way to spackle and sand walls for a smooth finish.
MUST READ: Part 3 for the painting part of this project.


