You don’t really have a true appreciation for your washing machine and dryer until they break down.
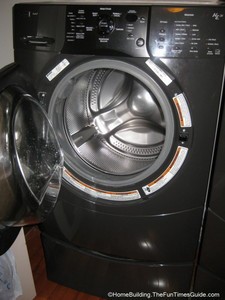
Our front-loading Kenmore washing machine broke down recently at the very beginning of wash day. Isn’t that how it always works out?!
The last thing I wanted to do was fool with a washing machine repair, but this kind of problem can’t be delayed when there are mounds of dirty laundry to be cleaned.
We have one of those high-efficiency Kenmore Elite models that eeks water and electricity. It was a huge improvement over the Whirlpool dinosaurs that we had prior to this pair and we haven’t had any problems out of either one of the new pair — except for the vibration that is caused by the super-high speed of the spin cycle on the dryer.
Other than that, our washer/dryer combo has been a great time-saver because they can wash huge loads of laundry efficiently.
I would like to state first and foremost that I am not a repairman. I’m an ambitious homeowner that likes to tackle any DIY project within reason. If you choose to follow any of my instructions, you do so at your own risk.
This is basically how it all went down…
A Recurring Washing Machine Door Latch Error Code
 The door latch on our washing machine would not latch and lock.
This caused the machine to give a code that scrolled across the little LED screen that read “F/dl”. I located the manual and scoured it, but I couldn’t find anything resembling that code within the manual.
I went online and Googled “Kenmore HE3t code f dl” and a couple of washing machine forums came up that contained that term.
One forum reader was having the same code on their washing machine. They were told to:
- Pull out the detergent drawer.
- Reach to the back of the opening.
- Feel for a small dial on the ceiling within the opening, and flick it counter-clockwise a few times.
- Replace the detergent drawer.
I tried it and it seemed to work. It didn’t make any sense though, so I feared that I had not heard the end of it. I was correct.
A couple of weeks go by without issue. That’s all it took for the F/dl code to rear its ugly head again.
Here’s what I did – I went back to the forums online and:
- I checked out some of the responses in some of the forum discussions that mentioned this code.
- One forum said to remove the front panel below the door and clear out the drain filter. Now I knew that didn’t make any sense either — because I had read that the code I was receiving (F/dl) meant that there was a problem with the door latch.
The best advice I found online for my DIY washing machine door latch repair was:
- Unplug the washing machine.
- Open the washing machine door.
- Remove the spring latch on the rubber boot.
- Push the rubber boot inward to access the door latch.
- Remove the 3 screws by the door latch. (You’ll need a Torx screwdriver in order to do this.)
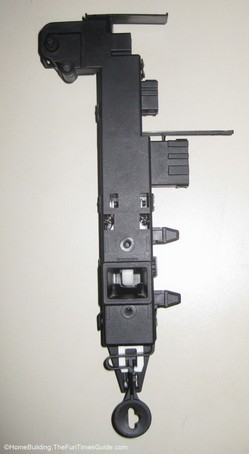
- Reach in and grab the door latch. Push it upwards to release it from the bracket.
- Make a note of the wiring before you unplug any of them. Carefully remove the plugs.
 Now you are able to examine the door latch. What next?
Here’s what I did:
- My door latch happened to be stuck in the lock position — which blocked the path of the latch on the door.
- I was able to make my way to the inside of the latch assembly and figured out how to release the latch so that it was in the unlock position by firmly depressing the metal plate and pushing the latch up into the assembly. (The metal plate is difficult to depress due to the heavy-duty spring, but it can be done.)
- After releasing the latch to the unlock position, I re-assembled it.
- I connected the wiring harness and hung it in the bracket.
- Beyond that, I didn’t see anything loose, so I re-installed it.
It still didn’t work. I received the same error code.
Here’s some helpful information for repairing your washing machine by knowing your machine parts.
Making Sense Of The Error Codes
The Diagnostic Guide with all of the washing machine error codes is located inside the washing machine.
You can find it by removing the front panel below the door. It will be located on the right side inner wall in a plastic envelope.
The Diagnostic Guide tells you all you need to know in order to check connections, and so forth. If you are knowledgeable in the area of electronics and have a multimeter, you should be able to test a few things in order to diagnose your problem and order a new part if needed.
In my case, I ended up calling a tech to come out. The diagnostic fee was $40 plus parts and labor. The $40 diagnostic fee would be applied to the labor charge if you let them fix it. The tech came out within 3 hours and after removing the door latch and making his diagnosis, he told me that the door latch assembly was faulty and would need to be replaced. He didn’t have it with him but would order it and be out the following.
Here’s a great resource for diagnosing washing machine problems.
DIY Washing Machine Door Latch Repair
I asked if I could order the part and install it myself. I had been standing there the entire time while he performed his diagnosis and saw how he accessed the door latch, removed it, and tested the connections — so I felt comfortable doing it myself.
He said it would not be a problem but that he would suggest accessing the door latch from underneath without removing the boot.
Apparently, replacing the boot properly is a bit tricky and could easily leak if not properly replaced. I had a little trouble with it, but was able to get it in place without issue.
While he was there I asked about clearing out the drain filter on the washing machine and he told me how to do it.
I ordered the part from my favorite online appliance parts website and had it delivered the following day. When I came home from work, I opened the box and replaced the part within about 10-15 minutes. I had some difficulty trying to replace the door latch from below through the panel — as the tech suggested — so I figured that if I replaced the boot satisfactorily the first time, I could do it again.
I ended up saving about $60 by ordering the part and installing it myself. That includes the $40 diagnosis charge and the next day air fee of $28 from Repair Clinic.
It was all worth my trouble — because not only do I know how to replace the door latch now, but I also know how to clean out the drain filter when the time comes. I also have the official Diagnostic Guide with all of the error codes for my washing machine in my possession.
Eventually, though, we decided to replace our washing machine, please read:
I started as a home-stalker… visiting brand new homes under construction in the neighborhoods near my house.
That inspired me to write about home building and home renovation projects — chronicling homes during different phases of construction from a consumer’s point-of-view. Basically, the tips you’ll find in my articles are a collection of checklists for what I think should (and should not) go into building or remodeling a quality home.


