 In my most recent post, I talked about planing the bottom edge of a door that sticks on the threshold. You may have noticed a can of Durham’s Rock Hard Water Putty in one of the photos. I also mentioned it towards the end of the article. "Rock Hard" is a great product and nice to have around when you come across small wood rot problems here and there. I’ve used this stuff for years, on occasion.
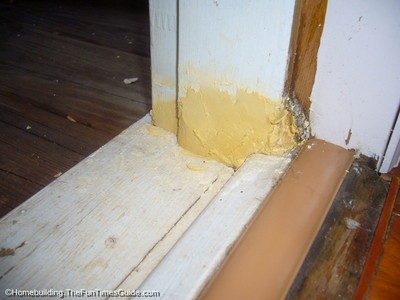
I happened to have one of those small wood rot problems on one of the door frames of my house. I originally wanted to replace the 2" x ½" board that is attached to the frame. Trouble is…it’s part of the door frame itself and not sold in places like Home Depot and Lowe’s. You have to replace the entire door frame…OR…do what I did…and what was also suggested by the folks at the big orange box.
Buy a can of Rock Hard!
In my case, I always have some Rock Hard available…um…err… that’s sitting on my shelf on my work bench…yeah..ok.
Water Putty is not like wood putty. It comes in a powder form, much like talcum powder, and it’s not pliable out of the can. Rock Hard is a gypsum-based filler product that has to be mixed with water in the correct amount to become something resembling putty, or bread dough, that you can apply with your putty knife.
In my case, I had a water rot issue on the exterior of the door frame at the bottom. I used a flathead screwdriver to dig the rotted wood out of the hard-to-reach crevices. I also used a small chisel and hammer to chip away the wood that was in the process of rotting and a small paint brush to clear away all of the rotted debris.
Once I was satisfied that the rotted wood was removed in its’ entirety, I got out my daughter’s hair dryer (Lord knows I don’t use one) and let it blow on the interior of the cleared-out hole to thoroughly dry the wood that remained. This would insure a good bond with the water putty that I would apply. The dryer ran for about 15-20 minutes before I was satisfied that it was about as dry as it was going to get.
You can follow the directions on the can for mixing instructions or you can do what I do. I just pour some Rock Hard putty powder in an old coffee can, soup can, or whatever I have sitting around that I could easily toss in the trash and then add a small amount of water. You want the consistency to be much like wood putty, if not a little bit drier than that. It is easier to work with and stays where you put it if you follow that one simple rule.
If you want to be green, have a re-usable pail, or vessel, on hand and wash it out thoroughly immediately after you’ve finished applying the water putty. Otherwise, you might as well just throw it away. By the way, work quickly with the putty as it will becomes more difficult to work with with each passing minute.
Once you get it to the right consistency, take your smallest putty knife (1" blade is good) and work it around just a bit and put some on your blade or spatula. Basically, just fill the hole and smooth it level to the surface. Give it plenty of time to dry and sand it smooth. Re-apply a second coat, if desired.
Feel free to prime and paint once the water putty has had adequate time to dry. This will depend on the thickness of the the water putty in the hole and the humidity level.
I would certainly recommend this product to the DIY weekend warrior. It’s like having a $5 insurance policy sitting on the shelf.
Related:
Everything you ever wanted to know about Durham’s Rock Hard Water Putty but were afraid to ask. It’s scary to even think about all of the possibilties!
Rock Hard water putty General repair uses such as filling holes in wood, tightening drawer knobs, fix door bumpers, patch cracked walls…and more. You can even color it to match your needs!
Tips for Using Wood Fillers on Stained Projects via About.com
Make Your Own Wood Putty via About.com


