 A few years ago, we wanted to change the look of the walls of our foyer and living room in our house to have a rag painting effect using an basecoat of yellow latex paint with a slightly darker glaze. More specifically, I used a method called rag rolling paint off. This is a great diy project for homeowners looking for something a little different other than just the run-of-the-mill paint job.
Rag rolling paint off was not that difficult to do, although it required a good game plan, quick hands and a lot of patience. I’ll explain what I mean by all of that later on. You’ll do fine…so let’s get started.
Materials and Supplies Needed for DIY Rag Painting

- Interior Base Coat Paint (Eggshell, Satin, or Semi-Gloss Enamel sheen works best. It is recommended that you DO NOT use a Flat sheen)
- Faux Glaze (Tinted color of your choosing)
- Paint Roller with 3/8″ nap and paint tray
- 2″ Tapered nylon bristle paint brush
- Low-tack painter’s tape (I prefer 3M Scotch Blue Painter’s Tape for Multi-Surface #2090)
- Drop cloths
- 5-gallon bucket
- Paint Stirrer
- Painter’s rags
- Bowl of water to dampen the rags
- Rubber or latex gloves
- Step stool or ladder
- Interior Latex Primer (optional)

Instructions for Rag Rolling Painting
Here’s the game plan:
- Remove furniture from the room or move it all to the center of the room and throw a drop cloth over it.
- Tape off the trim and all window frames.
- Paint the walls with a coat of primer.
- Paint the walls with 2 coats of your preferred basecoat color in the sheen of your choice. We chose a light basecoat to compliment the darker topcoat glaze for the rag rolling paint off method.
- Mix 4 parts (tinted) glaze to 1 part of the topcoat paint. For a more transparent glaze effect, increase the glaze percentage. For a more opaque look, increase the amount of paint to the mix. Mix thoroughly before application and occasionally during the process. Intermixing colors is called “boxing”.
- Fine tune your rag roll painting technique on a piece of cardboard before you begin.
- Cover a 3′ x 3′ area with the glaze mixture using your paint roller. Painting a larger area than that could easily dry out before you roll the rag over the glaze.
Tip: Apply a nice heavy coat of glaze. This assures it will still be wet before you finish your 3′ x 3′ area, and also provides better contrast from the basecoat.
- Take a 1′ x 1′ painter’s rag and dip it in the bowl of water and wring out the excess water. It should be good and damp…not dripping wet. Fold it in half. The size can vary somewhat. It’s not that important of a detail to be concerned with. Loosely roll it up like a cigar and then give it a couple of twists.
- Apply the rag to the top (right or left) of your freshly glazed section. With a light touch using both hands, begin to roll it down the entire length of the wet glaze. Repeat until the entire 3′ x 3′ section is complete.
- Move to the next section and repeat the process.
- In areas that are hard to apply the ragging technique (ceiling meets wall, wall meets window/door frame, etc.), use your brush to do a little creative “pushing”, “twisting” and “tapping”. Don’t fret over it…just do it and be done. It is more than likely that any “mistakes” will only be noticed by you.
- Start with a fresh damp rag once it becomes saturated with glaze. Using a glaze-laden rag after you wring it out over and over again is acceptable and sometimes desirable. It’s an art…not a science.
Tip: Blending the sections into one seamless canvas is the trick. Basically, work as large of a section as you can before the glaze dries out. Your productivity will increase with practice. This will give you the confidence to work larger sections and less seams to deal with. That is what I did and it worked well most of the time. Although there were a couple of times when I bit off more than I could chew and had to try and correct the seams with a fresh strip of glaze and rag rolling. That was the toughest part…blending for a seamless canvas.
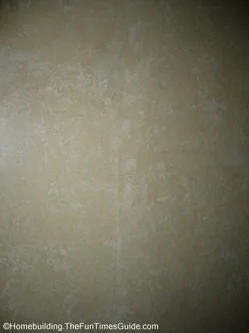
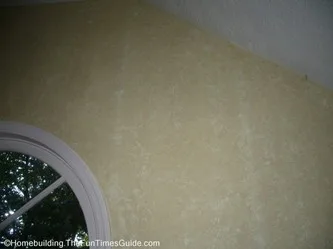
Here’s another area where you benefit from my experience with the process. If you look carefully at the photos below, you’ll see a couple of seams. DO NOT OVERLAP areas you’ve rolled already. This will give a slightly darker strip where you’ve duplicated (a seam). Keep a wet edge.
You might even notice a few lighter vertical stripes. That was caused by accidentally rolling over the same small strip twice. It basically soaked up more of the glaze than I would have preferred. Cut me a little slack. I have 14 ft. a cathedral ceiling in this room so I did a LOT of rag rolling on this project.
My best areas were achieved by a nice heavy coat of glaze with a fresh damp rag. Be diligent but work fast! Also, finish an entire wall once you’ve begun. That’s my best advice. Good luck!
Resources:


